DIY: Cardboard Loom Weave
This introduction tutorial to weaving requires basic supplies, and no loom – because you’ll be making your own! I took to this trend so quickly, and still maintain that this is one of the most fun, relaxing and peaceful DIY projects.
What you’ll need:
- Various balls of yarn- A piece of cardboard (I used my Book Depository packaging!)- Ruler- Pen/pencil/marker- Scissors- Yarn needle- String- Small wooden rod or dowel
Step 1: Decide on your preferred width for your weaving and mark it on the piece of cardboard. Then, mark ¼ inch increments between these points along the top and bottom.
Step 2: Cut ½ inch slits along each of the ¼ inch marks.
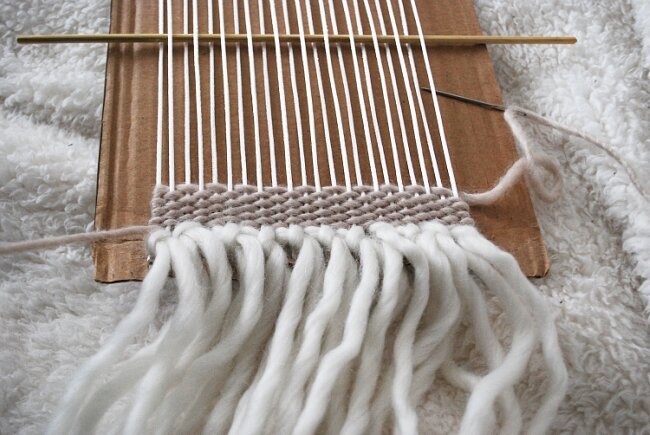
Step 3: Using your string (or an extra piece of yarn, if you like), wedge the end into the first slit of the cardboard, leaving a few inches hanging at the back. Wrap the yarn across the front surface of the cardboard, wedging it into the corresponding slit on the opposite edge. Then, wrap the yarn around behind and wedge into the second slit, bringing it to the front surface again. Repeat until completed. The string should be reasonably tight, but not so much that it bends the cardboard or you’re unable to lift each strand.
Step 4: Now that the loom is done, it’s time to start weaving. When weaving, I like to start at the bottom and work my way up. I added tassels at the bottom for a rya effect, so let’s begin there. Lay one or two pieces of yarn (10-15 inches) on top of the first two strands. Bring the ends of the yarn up through the middle of those two strands, and pull down gently to make a knot. Repeat until you’ve reached the end.
Step 5: Now, pick another colour of yarn, cut off a long piece, and thread onto the needle. (Note that depending on the type of yarn you’re using, some may be too thick for a needle. In this case, you can just weave it with your fingers.)
Step 6: Weave your needle over and under each strand until you’ve reached the end of the first row. I used a small rod to separate these strands and make this process a little quicker. On the second row, your weaving must be the opposite of the first. What this means is, if you went under on your last strand, the next weave on that same strand must be over.
Step 7: You’ll want to continuously push your work to the bottom to keep it neat. I know that some people like to use a fork for this, but I find it easy enough to just use your fingers. Also, be careful not the pull the yarn too tight at the edges, otherwise the weave will be pulled out of shape. As you can see, this still happens to me a little bit… we’re using a cardboard loom so it’s not going to be perfect, but try your best here!
Step 8: Keep repeating Step 6 until you’re ready to change colours. When I change colours at the end of the row, I generally leave a few inches of yarn hanging to deal with later.
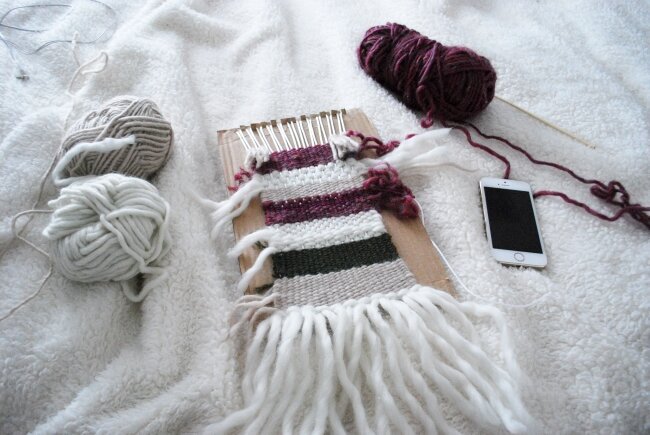
Step 9: Experiment with different types and colours of yarn, as well as techniques! For instance, with thicker ply wool, I sometimes weave under every two strands. Or, maybe you’d like to add rya elsewhere on your weaving!
Step 10: Tidy up those lose ends by threading each yarn onto your needle and weaving it down the edges of your weave.
Step 11: When you’re done, bend the cardboard tabs at the top and bottom to remove the weave from the loom. For the top, hook the loops onto your rod. For the bottom, cut the loops, tie a knot, and trim.
Step 12: Secure a piece of string on each side of the rod and hang your creation!.
.
– By Whim’s DIY / Craft Blogger Nikki. You can also follow Nikki on Twitter or Instagram!
Who else will be making their very own cardboard loom weave? We'd love to hear your thoughts in the Comments section below!


